In the previous article, we saw 5 ways to avoid Wasted Renders in React Native, and in this one, we uncover the other 5. We would also take a detailed look into the impact these optimizations had on our application performance.
The first 5 ways were
- Use Pure Components for Class-Based Components
- Use React.memo() for Functional Components
- Write a shouldComponentUpdate method for Components
- Avoid passing new references for unchanged data
- Avoid binding values in functions inside render() function
and now we start we the 6th one
6. Avoid using spread operator when passing props
We frequently need to create higher-order components in react, for example, a wrapper component over a 3rd party library for simplifying its use. Consider the code snippet given below:
class UaText extends Component {
  render() {
    return <Text {...this.props} />;
  }
}
While this will work fine in most cases, in few cases we might be accidentally passing some props that are of no use for the child component. While doing so, we will cause a lot of wasted renders of the child component. To avoid this, we can be explicit about props that we pass to the child component. See the example below:
class UaText extends Component {
  render() {
    return (
      <Text
        fontSize={this.props.fontSize}
        fontFamily={this.props.fontFamily}
      />
    );
  }
}
7. Caution while using this.props.children
Let us consider an example of a higher-order component that renders the child components in a full-screen modal.
const Container = styled.View`
  position: absolute;
  left: 0;
  top: 0;
  height: 100%;
  width: 100%;
  background-color: rgba(0, 0, 0, 0.5);
`;

class Modal extends React.Component {
  render() {
    if (this.props.isOpen) {
      return <Container>{this.props.children}</Container>;
    } else {
      return null;
    }
  }
}

// Usage:
class App extends React.Component {
  render() {
    return (
      <Modal isOpen={condition}>
        <ChildComponent />
      </Modal>
    );
  }
}
In such situations, if our child component is a big one or not a pure component, this might lead to wasted renders on each render cycle of the parent component. For such UI based HOCs we can use the alternative implementations given below:
- Using styled components: It is most suited if we need a stateless, prop-dependent UI component. The same
<Modal />component can be written in the following way:
export default Modal = styled.View`
  position: absolute;
  left: 0;
  top: 0;
  height: 100%;
  width: 100%;
  background-color: rgba(0, 0, 0, 0.5);
`
Depending on whether we wish to keep <Modal /> in our DOM tree or not, we can use props.isOpen inside our styled component to set display:'none' or conditionally render <Modal /> in the parent component.
- Using functions as children: We can pass children as functions instead of components to avoid the use of
this.props.childrendirectly. This gives us more control over props being passed to the child components and helps in avoiding accidentally wasted renders. An example is given below:
class Parent extends React.PureComponent {
  render() {
    return (
      <View>
        {this.props.children(this.props.propA, this.props.propB)}
      </View>
    );
  }
}

class App extends React.Component {
  renderChild = (propA, propB) => {
    // use propA, propB to control Child component renders
    return <Child propA={propA} propB={propB} />;
  };

  render() {
    return (
      <Parent
        propA={propA}
        propB={propB}
        children={this.renderChild}
      ></Parent>
    );
  }
}
Here, we have the ease of controlling renders of child components using explicit props. This is because the parent component will only re-render due to a change in propA or propB and once it re-renders, renderChild will be called re-rendering the child components. Here, renderChild can be memoized to achieve further optimization on child re-renders.
8. Caution while using styled-components
Let us consider an example of another higher-order component that wraps react-native's <Text /> component. This can be used to limit flexibility offered by <Text /> through exposing a simple interface on specific use cases such as applying font family based on weight prop.
const UaText = React.memo(({ style, children, weight, ...props }) => {
  const getFontFamily = () => {
    switch (weight) {
      case "semibold":
        return styles.semibold;
      case "bold":
        return styles.bold;
      default:
        return styles.normal;
    }
  };

  return (
    <Text style={[getFontFamily(), style]} {...props}>
      {children}
    </Text>
  );
});

const styles = StyleSheet.create({
  normal: { fontFamily: FONT_NORMAL },
  semibold: { fontFamily: FONT_SEMIBOLD },
  bold: { fontFamily: FONT_BOLD },
});
As we previously saw that we can convert this component to a styled component to avoid accidentally wasted renders. This would lead to an implementation similar to the below code:
const StyledText = styled(UaText)`
	 // Add further styles here
`
But, in such a case, whenever the parent component of <StyledText /> re-renders, <UaText /> will be passed a new reference for this.props.style, this leads to wasted renders. We can avoid using styled component inheritance for React Components. Here, instead of wrapping <Text /> in <UaText /> we can extend styled.Text and implement the same functionality as <UaText /> like below:
const UaText = styled.Text`
  font-family: ${({ weight }) => getFontFamily(weight)};
`
9. Using Animated.View instead of View
Whenever we have a component in which we update the Native View frequently using inline styles, using Animated.View along with the optional native driver saves a lot of re-renders. Suppose we have a <Pointer /> component that is used to render the educator's pen pointer on a canvas whenever the teacher starts writing.
const LearnerPointer = styled.View`
  position: absolute;
  top: ${(props) => props.top}px;
  left: ${(props) => props.left}px;
`;

class Pointer extends React.Component {
  render() {
    const top =
      this.state.position.y * this.props.canvasHeight -
      10 / this.props.canvasScale;
    const left =
      this.state.position.x * this.props.canvasWidth -
      10 / this.props.canvasScale;

    return (
      <LearnerPointer top={top} left={left}>
        <SomeComp />
      </LearnerPointer>
    );
  }
}
In the above implementation, we are updating pointer locations using inline styles when an update is required. This leads to a re-render of the underlying View every time the style changes. If such an update is frequent in our app, it would lead to high CPU usage. We can avoid these wasted renders using the Animated API provided by React-Native.
class Pointer extends React.Component {
  render() {
    const top =
      this.state.position.y * this.props.canvasHeight -
      10 / this.props.canvasScale;
    const left =
      this.state.position.x * this.props.canvasWidth -
      10 / this.props.canvasScale;

    return (
      <Animated.View
        style={{
          position: "absolute",
          top,
          left,
        }}
      >
        <SomeComp />
      </Animated.View>
    );
  }
}
When we use Animated.View, the following process takes place behind the hood:
- On animation start,
requestAnimationFrameis fired in JS - New positions are calculated in JS
- JS serializes new position values and sends them over to the react-native bridge
- On the other end of the bridge, Java (android) and C# (iOS) deserializes it and updates underlying Native View
- The frame is then updated on the screen.
As we can see, Animated.View styles don't trigger a re-render of React Native Components, that is why their use should be preferred over <View /> in such situations to avoid wasted renders.
10. Check current state before using setState
This is one of the simplest yet powerful ways that can be used in react components to avoid wasted renders. Whenever updating a state, we can compare the new value with the current state to check if it has actually changed. If we perform setState in a case where the current state and new values are the same, it will lead to a wasted render. Consider the statement below:
this.setState({ stateKey: "value" });
When this statement executes, we will find that previousState ≠ nextState, but, previousState.stateKey === nextState.stateKey. This leads to a wasted render due to state updates. We can write a simple comparison check to avoid this.
if (newStateKeyValue !== this.state.stateKey) {
  this.setState({ stateKey: newStateKeyValue });
}
The Impact
We profiled our app on the Xiaomi Redmi Note 6 Pro with 4 GB RAM and we saw some stellar out-of-the-box improvements.
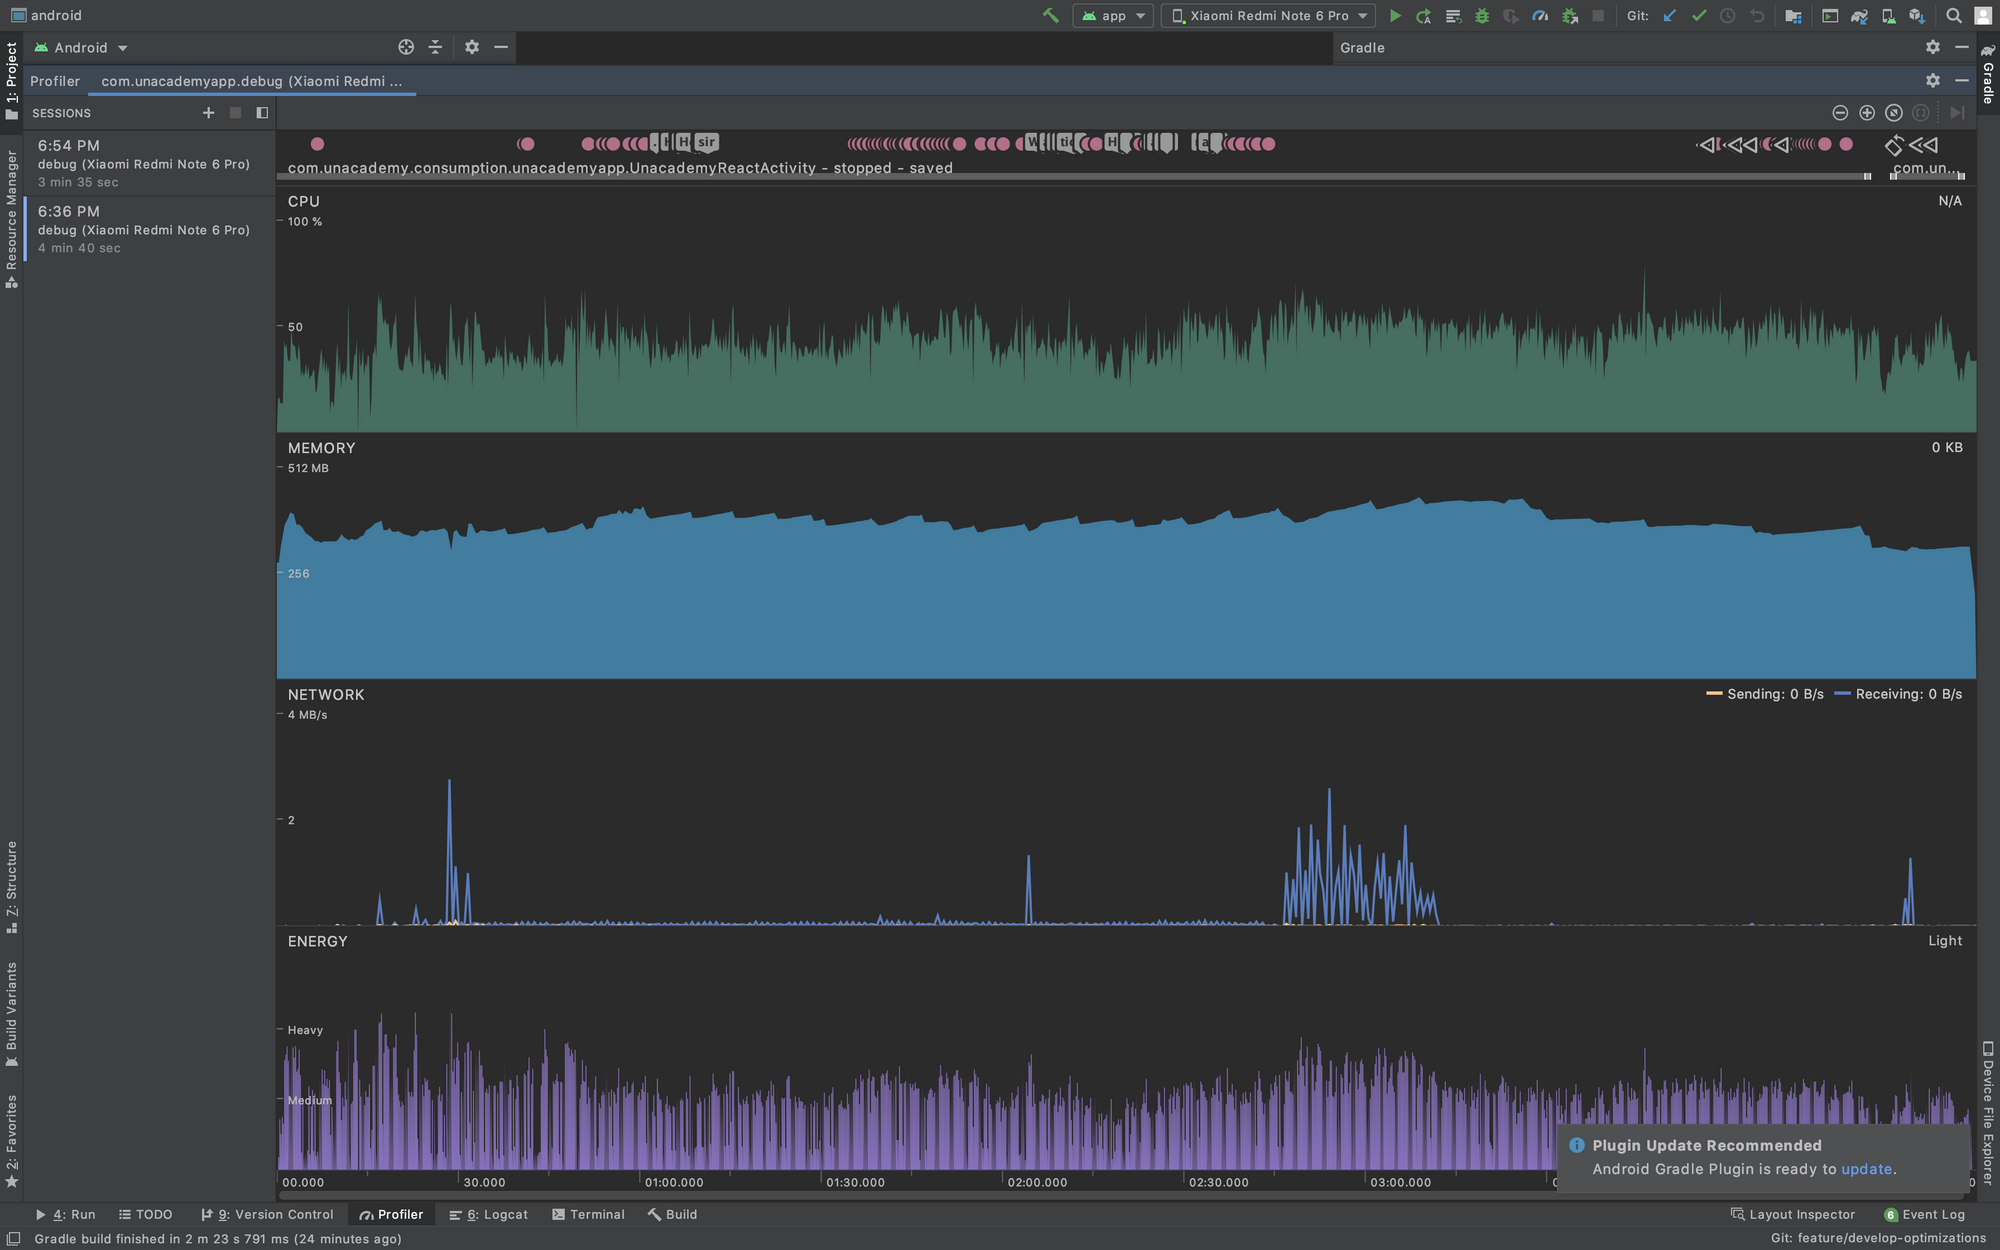
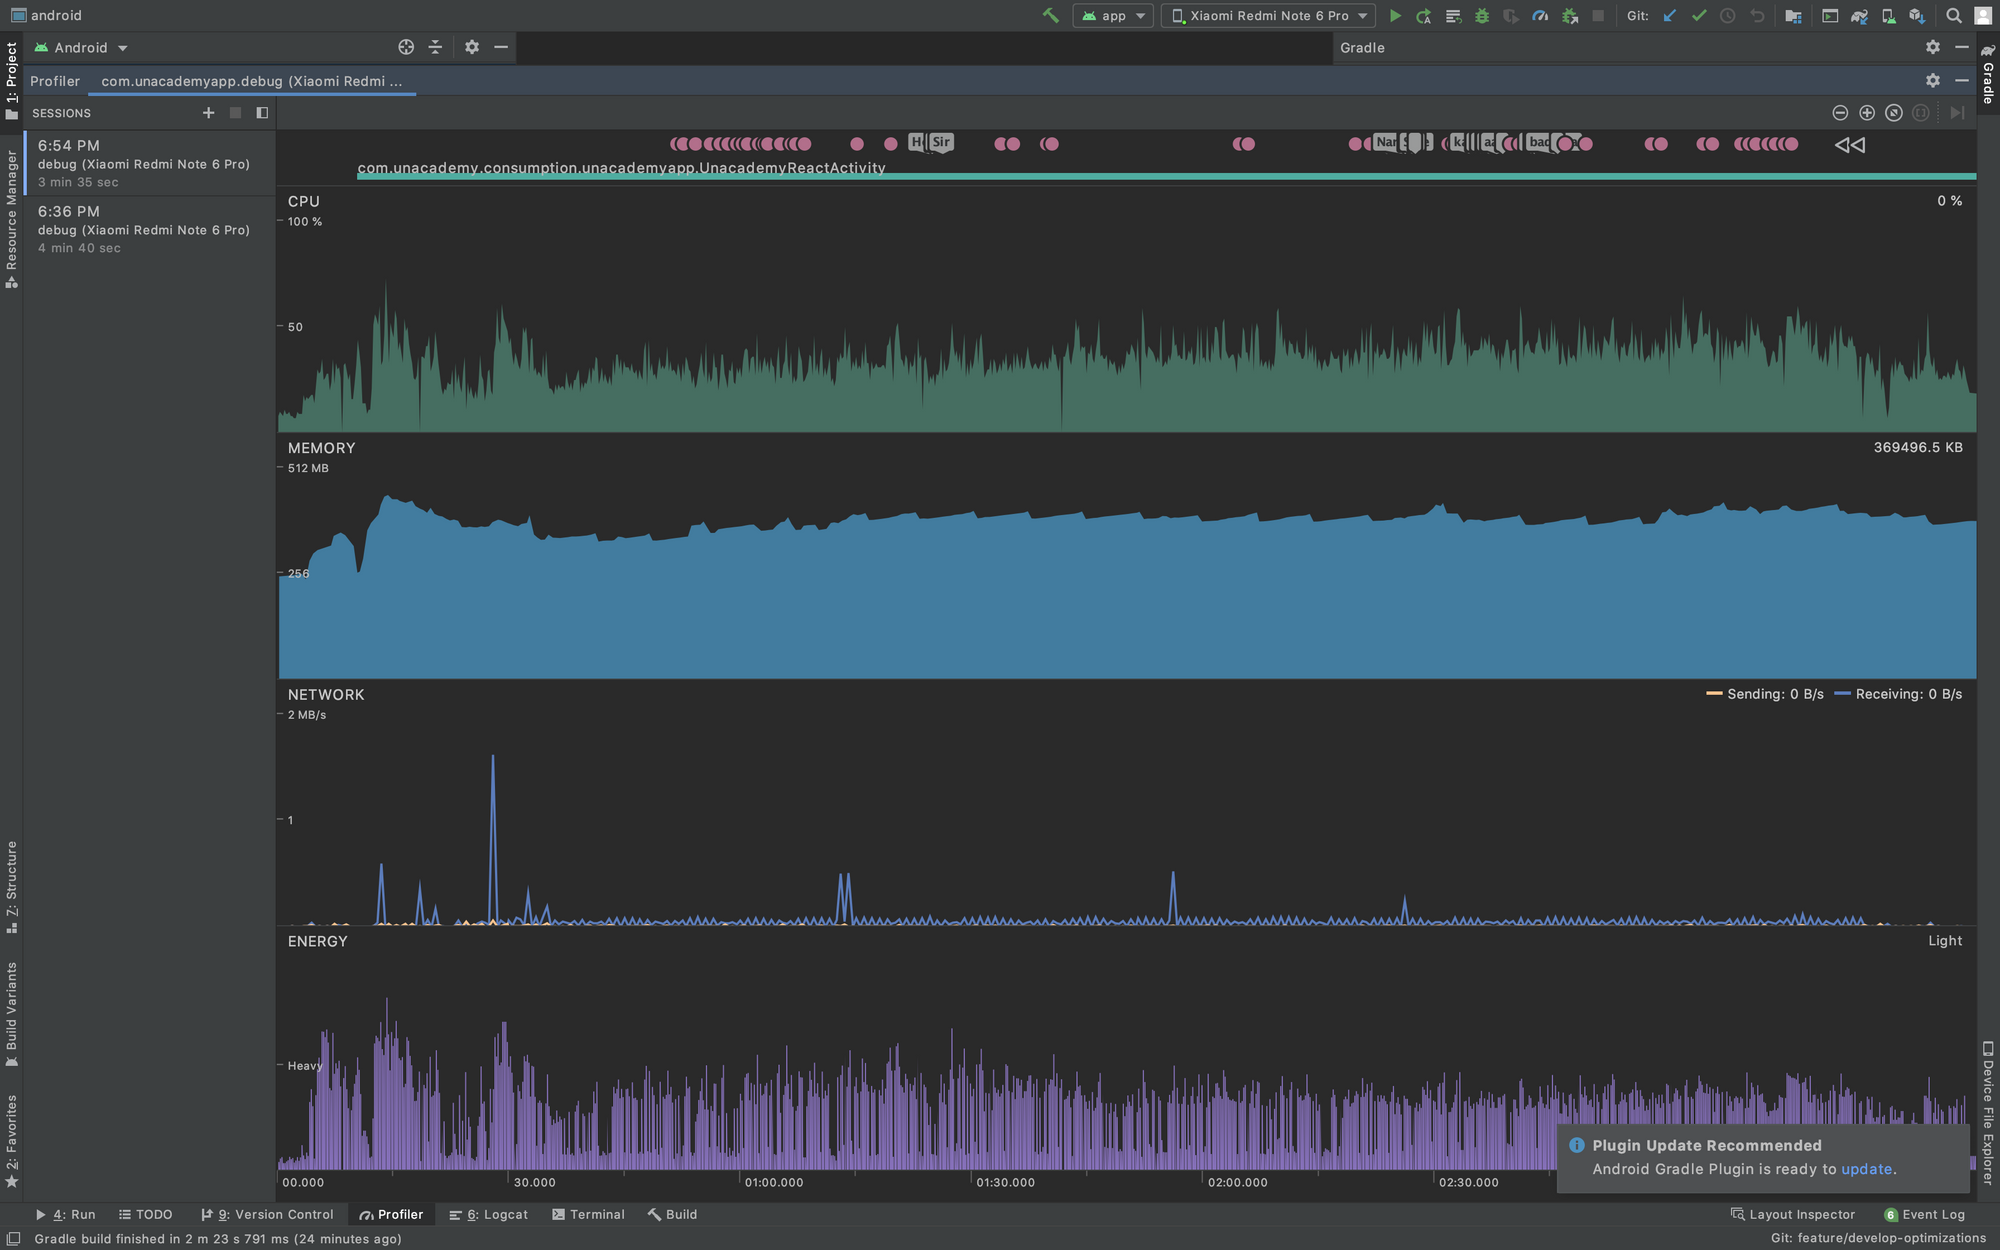
The Average CPU usage drops to 30% from 45% and with no bursts of spikes. The drop of 15% plays a massive role in delivering an exceptional experience to our learners while watching our live and recorded classes.
With the introduction of hooks in React 16, there are numerous other best practices to follow which reduces the wasted renders even further, for example using useMemo. These practices constitute the theory, which one is expected to know before using them and are best covered on React's official documentation. In this blog, however, we have tried to cover most of the practical stuff that would help a developer to be mindful of while writing new components or optimizing existing ones. We hope these tips and tricks will help you in improving your current as well as future react apps performance.